


A recent question on the Northumbrian Pipers Group Facebook page asked ‘What are the essential things any piper should know and be able to do about maintaining their pipes?’ We asked our pipemaker Julian Goodacre the same question.
intDid you make a New Year’s Resolution this year? Have you kept it? Congratulations!
Might I now suggest that the time is right for you to start a new Half Year’s Resolution? And if you have failed with your Resolution, then this is the very time to start a new one. My suggestion is that you now resolve to spend a little more time doing routine maintenance on your pipes. Bellows pipes require less upkeep than mouth-blown ones, but there really is no excuse for totally ignoring their maintenance. Make it a regular habit to check their condition and carry out any maintenance that they require.
CHANTER
Check that the hemp binding is tight enough so that there is no absolutely possibility of the chanter falling out of the stock. Add a bit more hemp or cotton if it is loose. Make sure that the chanter reed is secure in the reed seat.
DRONES
Drone hemping
There are two different requirements for hemping the drones. The bottom tenons that fit into the common stock should be tight, so that there is no chance of them moving when you are tuning. However, there is a happy medium to be achieved with the hemp on the drone slides- the hemp binding should be free enough so that you can tune them easily, but not so loose that they will not stay in position. If a slide is too tight try a light smear of Vaseline (or lip salve) to ease it. If this does not work, you can remove a few twists of hemp. If the slide is too loose you can add a few twists of fine cotton thread on top of the hemp.
Sometimes the wood on the female end of a drone slide distorts slightly which creates a ‘tight spot’ and makes tuning tricky. This requires the attention of your pipe maker - it is a quick and easy job to run a reamer through it.
Loose ferrules.
These sometime come loose and need to be re-glued. I use 5-minute Araldite epoxy glue for this. You need to remove any glue that remains on the inside of the ferrule. You can either scrape it off with a thin knife or clean it with a rolled up piece of abrasive paper. Creating a rough inside surface to the ferrule will improve the adhesion of the epoxy. If the ferrule is very loose you could try wrapping a few twists of fine thread around the wooden part first. This can be a messy process and I always mask the outside of the ferrule, and the visible bit of the wood which abuts the ferrule with masking or insulation tape. After a few minutes the glue begins to set and if you can catch it at the ‘toffee’ stage it is easy to peel both the tape and surplus glue together.
Polishing ferrules
If your ferrules are made of brass or silver, you may want to polish them. The metal polish might possibly stain the wood, so I sometimes also put masking or insulating tape on the wood that abuts the ferrule while I am using the polish.
Reeds
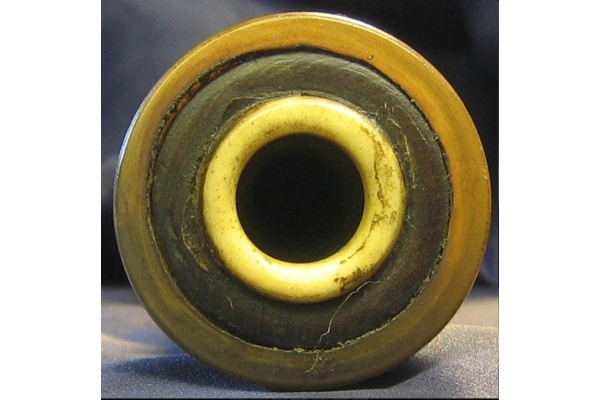
If you are doing a lot of playing, composite drone reeds may eventually benefit from cleaning. Slip a piece of clean white paper under the tongue, and then withdraw it slowly while holding the tongue firmly against the seating.
It is important that your reeds are not loose in their seating. It is an awful fankle when a reed drops in the bag and by the time you have retrieved it you may well have also have damaged it. The composite reeds that I make are bound with PTFE tape which is slippery by nature. (see note below) My trick is to use white PVA wood glue to bed the reed into the reed seat. This glue does not really provide much adhesion to the PTFE or the oil treated wood, but it does hold the reed in place. Only use a minute quantity of glue; just enough to balance on the end of a matchstick.
ARE YOUR PIPES AIRTIGHT?
There is really no excuse for having a leaky bag and even a small leak can adversely affect your playing. At first you may not notice it and you may start to compensate for it by pumping a little bit more with the bellows. But the nature of leaks of any kind is that they usually get worse. As it gets worse you will be increasingly compensating with the bellows without realising it and playing your pipes will become less and less enjoyable. The good news is that once you find the leak and cured it, you should find that playing should become a pleasure again!
Testing for leaks is straightforward. Stop off the end of the drones with plugs or Blue tack. Remove the chanter and put a cork in the stock or cover it with your thumb. Inflate the bag fully with the bellows and then squeeze. The bag should remain tight for at least 20- 30 seconds. If you can feel it deflating, then you will need to take action to locate the leak.
Clack valve
First check the non-return clack valve. Inflate the bag again, unplug it from the bellows and squeeze and listen for any escaping air. The leather may not be seating correctly and require a bit of manipulation. A couple of drops of almond oil on the leather keeps it supple and often solves the problem. If the leather needs replacing, you can either make a new one yourself out of some soft leather or ask your pipemaker to send a replacement which will be already cut to size. Remember that the valve should be positioned with the hinge at the top when the bag is held in playing position.
Leaking around the stocks
The cord that is used for tying in the stock may have loosened and begun to allow the leather to work loose from the bag. It is important to check that there is visible leather above the binding. i.e. you can see leather above the binding on the ‘non- bag’ side of the stock. Seasoning is oily and provides lubrication for this slipping process to occur. So it is important to keep checking.
If you think the leather is slipping towards the bag you will need to untie the stock and pull the leather back up the stock and hold it in place with insulating tape while you re tie the stock. This needs to be done with very strong cord; I use a braided nylon cord. Rather than writing a lot of words about this process I suggest you go on Youtube where you will find an abundance of helpful videos on this process. Most of these videos will be for tying in bags on highland pipes.
There are many minor variations in techniques, but it will give you a far clearer idea of the process. You can buy suitable tying-in cord on the web or get a length from your pipemaker.
Leaking stitching
You can check for these leaks by inflating the bag and listening or by sensing leaking air it by passing your lips near the stitching.
Leaking through the leather
If the bag has not been seasoned for many years the pores in the leather may become open and have begun letting air through. You can test this on bags that are made with the smooth side on the outside. Smear some saliva on a small area of the outside and squeeze the bag and see if it bubbles.
I have heard storied of pipers testing for air leaks by submerging the bag in water.
All I shall say about this abhorrent behaviour is DON’T! (I mean that.)
SEASONING BAGS AND BELLOWS
Warning. The seasoning that I use is oil based and works well on traditionally made bellows bagpipes. However, some pipemakers have now developed different gluing and stitching techniques which may not be compatible with this seasoning and it is vital that you consult your pipemaker beforehand if you are in any doubt about using this method.
Seasoning
If the stitching or the leather is leaking, then it is time to season the bag. The seasoning that I have always used for bellows and bellows-blown bags is made from beeswax and olive oil. The oil softens the wax and helps it penetrate deep into the pores of the leather and the oil nourishes it, keeping it supple and airtight for many, many years. It is easy to make and is tasty to eat! It is an enormous comfort to know that if I was washed up on a desert island I could nourish myself by chewing on my bag and bellows.
Take approximately one part of beeswax to four parts olive oil (by volume). Place this in a jam jar in a microwave and slowly heat it. It takes quite a while to melt all the wax so I usually chop it into small pieces to speed the process. Then let it cool to room temperature and see if it sets with a similar consistency to Vaseline or soft margarine. After that you can add a bit of oil or wax and re heat it to achieve the required consistency. If you have used too much wax it tends to form into clots which can clog the reeds. If you have used too much oil in the mix then it will weep out of the leather a bit too readily.
Seasoning a bag
Remove the drones and chanter and put them well out of the way, where they cannot roll off the table and damage the reeds. Heat the seasoning until it is liquid and then let it cool for maybe 10 minutes. If it is too hot and it will instantly soak through the leather, but it must remain liquid enough for you to be able to pour it in. Make a rolled tube of paper to line the blowpipe stock to prevent the seasoning getting on the inside of the stock. Hold the bag so that all the stocks are facing upwards and pour in a small amount down the blowpipe stock. About an egg cup full should be fine to start with. Now rub the bag so that the entire inside surfaces are lightly coated. Keep rubbing the inside surfaces against each other and “work” the seasoning into the seam and leather. It will cool and set quite rapidly and you can then repeat the process if you can feel that the leather has soaked it up. If the leather is really ‘hungry’ for seasoning it may be best to leave it for an hour or so to give it time to soak in the seasoning and then repeat the process.
A ‘little and often’ approach is far better than sloshing a mugful in! If you over-season a bag you will get an unpleasant lump of wax in the bottom of the bag that may later produce clots which may clog the reeds.
You can clean the inside of the stocks with rolled-up tissues.
BELLOWS
Leaking Inlet Clack Valve
You can easily test if your bellows are leaking by putting your thumb over the outlet, filling them and squeezing. They should stay fully inflated for at least 20- 30 seconds. If they are leaking the first thing to do is listen to the inlet clack valve. If you are lucky you might be able to solve a leak here with a few drops of almond oil to soften the valve. If this doesn’t do the trick you will need to ease out the entire valve assembly. If it is tight then I sometimes insert a blunt dinner knife under the outside rim and twist the knife. (To prevent making marks on the bellows board I place a piece of thin card between the knife and the board.) Once it is out you can inspect the valve and see if you can adjust it to seal correctly. If it need replacing you make a new one or request a spare leather valve from your pipe maker. Remember when reassembling that the valve should be positioned with the hinge at the top when the bellows are in playing position.
Leaking through the leather
If the bellows has not been seasoned for many years the pores in the leather may have begun to become open and be letting through air. You can test this on bellows that are made with the smooth side on the outside. Smear some saliva on a small area of the outside and squeeze the bellows and see if it bubbles. (You could try this test in a pub session when they are playing a tune you don’t know).
Leaking transfer pipe
If the transfer pipe is attached to your bellows it is worth checking that it is airtight. These pipes can be made of neoprene, rubber, leather or plastic and it is possible that it may have sprung a leak and require replacing
Leaking join between wood and bellows boards
Leaks can occur in the join between the bellows leather and the bellows board. Traditionally this join is stitched, but some makers now use nails. The other area of stitching that is prone to leak is the leather-to-leather stitching behind the hinge end of the bellows.
In either case your bellows will need re-seasoning and this can be a messy process so wear old clothes!
SEASONING BELLOWS
Disconnect the hinge system, remove the bellows inlet clack valve assembly and block up the outlet. Pour a small quantity of seasoning in through the valve hole. You will need to maneuver the bellows quickly while it is still runny to ensure it covers all the inside surfaces of leather with a light coating. It is easier to pour in small quantities and work it into one side and then repeat the process on the other side. If you use too much you get clots of it forming which can clog up your transfer pipe. These will not damage anything but can be a bit of a nuisance (and sometimes embarrassing) until you blast them out of the system. I suppose if you have a poorly made set of bellows with horrible big leaks you could add more wax to make it thicker. There are other desperation measures involving pasting on mastic or gasket sealant onto the outside of the stitching, but this must be considered as a ‘desperation measure’ and not a long-term solution.
FINAL POINTS
PTFE Tape
I have a considerable Drone In My Bonnet about PTFE tape, so brace yourself and read this paragraph carefully or there may be dire consequences. PTFE, or Plumbers Tape is made of Teflon, a substance which reduces friction and in effect works as a lubricant. Thus, it is totally counterproductive to wind this tape onto the chanter, drone or blowpipe tenons that fit into their stocks. Using it will increase the possibility of your chanter or drones falling out and damaging your reeds. And we don’t want that, do we? There is certainly a logic for using it on your drone slides, so that you can adjust them easily. And it works wonderfully as a seal when making reeds. But don’t use it elsewhere. Do I make myself clear?
If you have read and understood the previous paragraph, please place a tick in this box and sign your name next to it.
Thank you; and now my rant is over.
Bores; To Oil or Not to Oil?
That certainly is the question and one that I cannot provide you with a definitive answer. I know that Northumbrian pipers sometimes oil the bores of their chanters and drones.
I make all my pipes from British hardwood which I treat with a vacuum and pressure oil treatment. This fills all the cells in the wood with linseed oil which eventually hardens and I never recommend anyone to oil the bores on my pipes. However, many other makers use imported timber, and some may recommend oiling bores. You will have to consult your pipemaker to see what they suggest.
If you feel that the outside surfaces of your pipes look a bit dull no harm can be done by wiping a minute amount of almond oil on them. Don’t slosh it on! Just put a few drops on your finger and then spread it about the outer surfaces. After that you can wipe the surplus off with a tissue or cloth and it will cheer the look of the pipes, though sadly it won’t improve your playing!
IN CONCLUSION
Pipe maintenance is not rocket science; it is common sense. Nothing I have suggested would be of any surprise to Geordie Syme or any of the pipers of old. If your living depended on your pipes working well, you would have a very real incentive to carry out regular maintenance.
I suggest you stand in front of a mirror today and look yourself in the eye while you repeat these words “From today onwards I resolve to carry out routine checks and maintenance on my bellows-blown bagpipes”.
And the next time we meet up you can tell me what a difference this resolution has made to your life and piping.
Julian Goodacre May 10th 2018
