3D-printing in the bagpipe wilderness
Donald Lindsay introduces his innovative work in pipemaking
Like many Smallpipers, for as long as I've had Smallpipes, I've been day dreaming about ways to increase their range. In the early days, I remember discussing these ideas with Philip Gruar, the maker of my pipes, at length on the telephone. I've no idea where he found the patience, but these conversations helped to lay the groundwork for a concept which I'm now able to physically hold and play music on, which is something I find quite exciting.
In the beginning I wasn't really aware of the constraints of pipe making, and didn't have much of a grounding in music theory, but probably around 15 years ago, after borrowing a book out of the library on woodwind instrument making I began to footer about with cheap souvenir practice chanters, and sketch ideas. Early sketches included such impractical, and impossibly expensive ideas as a double chanter, with each chanter fully silver keyed in an arrangement that gathered the keys on either side in the form of two little 'keyboards'. I even gave it a name, the Glengoyne pipes, in honour of the place I was walking when the idea first dawned on me. This nightmarish contraption wasn't explored any further at the time, although I'm not ruling it out now that I've got access to 3D printing! Around the same time, having had the problem of the interval gap explained to me, I can't remember by whom, I took another practice chanter, stopped up some holes and drilled others, and produced one that used all 10 fingers, thus filling in the gap. I'm fairly sure I then asked a pipe-maker or two about the possibility of producing one, but to no avail. Some years after this I got hold of a Maui Xaphoon, which uses the same principle - but by then I'd already become convinced that the straight-bored 10 fingered chanter was a non-starter, since it required the piper to 'throw away' their learned technique. Over time, I'd come to realise that if an extended range chanter was to be anything other than a novelty, or a 'one off', then it had to be very accessible to pipers.

The next idea I followed up, which resulted in an award from The Arts Trust of Scotland, and a playable set of pipes made by Nigel Richard of Garvie Bagpipes, was to fill in the semitones of the basic Smallpipes scale using a 'flea hole' like the one on the Hungarian Duda (which I had been learning to play). I'd 'prototyped' this idea on a practice chanter by using a lollipop stick with a hole through it when I first discovered the Duda at Stirling University. While this is a simple concept, the execution proved more difficult. The resulting smallpipes, pitched in C, would only provide the semitones with the reed very open, making them very hard work to play. Over time they were tamed, and came to be a very attractive instrument. Using the flea hole to provide the semitones involves a lot of compromise, but it has proved possible to produce a very attractive 'chromatic' scale in this way. To tune one semitone with a flea hole is to tune them all, but once this art is learned, it's possible to temper them very well to the drones.

Once the flea hole had been tamed, I went back to considering ways to extend the range outwith the traditional scale. I began by looking for a way to 'overblow' high 'b' on an 'A' chanter. The first method I considered, to try to close the interval gap, was to flare the chanter a very small amount. It's clear that, within a certain very narrow cone angle, a flared chanter will still behave as more of a 'cylindrical' than a 'conical' instrument in terms of its tone and so on (cylindrical and conical are very relative terms). By this time, I'd gathered a basic working knowledge of woodwind acoustics. I had also read about didgeridoo players managing to flatten the 'toot' note incrementally by changing the shape of the instrument, and set out to find out if a gentle flare might bring the second register within reach. Some of the models I made, little 'telescopes' made of plastic hobby tubing, produced the result I was looking for. I found a tube shape that produced a G fundamental, and on opening a little register hole drilled at a predetermined point, a high B from the same length of tube. It also still seemed to sound like a Smallpipe chanter, more or less. To have a uniform effect over the whole range of the chanter though, it would need to be a fairly uniform flare. I was able to obtain lengths of broken carbon fibre fishing rod, which provided conical tubing close to the right angle, but not close enough. This line of thinking stalled at this point, as I began to look towards extending the range downwards, towards 'D' - something that would solve the problem of the interval gap 'by the back door', without the complexity of cones.
The current design of 'extended range' Scottish Smallpipes chanter that I'm working on has its roots in a well known trick that I referred to in an article published in the December 2000 edition of Common Stock, of clamping the bottom of the chanter between your knees to sound low Fsharp. I tried inserting tubing to lower this note to 'E', and found that this allowed a high 'B' to be produced by overblowing. The 'knees together' look isn't a good one, though, so I considered the idea of a chanter that might be stopped 'on the knee' with a small extra length of doubled-back tubing connected to the main bore at the end. When the chanter was stopped on the knee, the doubled-back section would sound, either a low Fsharp, or ideally an E (to allow a high B to be overblown). I duly made a little dog leg of hobby tubing, and poked it into the end of the chanter. Success! Noticing the potential to use the back thumb to get both notes, I began to draw out diagrams, using a spreadsheet that I've made (based on one in Bart Hopkins book Air Columns and Toneholes) that calculates approximately where the tone holes should go on a chanter with a given reed. Having seen Andy May's Northumbrian Smallpipes chanter while performing with him at the Sage in Gateshead some years ago, I thought at this point of simply stopping the bore at the bottom, right at the 'low A' hole, and doubling back up the way from there, as Andy had done to reach low 'A'. This immediately brought the low G hole within reach of the right hand thumb, and by reducing the hole size I placed Fsharp right beside it. The low 'E' hole fell into place near the left hand pinkie finger - I initially put the two chanters beside each other to put this hole within reach of the pinkie finger, but on 'discovering' 3D printing I realised I could put one bore behind the other, and have a 'branch' tube emerge at that point to bring the hole to a point where it's comfortable for the pinkie finger to cover.

By this time I had become quite good at building 'model' chanters using plastic and brass hobby tubing, and tested some of these ideas in that way, to confirm that they would work. It wasn't until I discovered 3D printing however, that I was able to produce a full working chanter to this design. I stumbled across 'MakLab' on my return to Glasgow in early 2013, quickly enrolled as a member, and began printing the first prototypes days after that. Initially, I used Google Sketchup to draw the models, moving on to more reliable AutoCAD as the project progressed. The printer I was using at this point in MakLab was a simple 'Ultimaker', typical of the 'hobby' type 3D printers that emerged as a result of the 'RepRap' project which set out to design a printer that could be built at home using available parts. I did also try to print out chanters on an original RepRap Prusa Mendel that had been built by enthusiasts at MakLab, but it proved to be a more difficult machine to use.
A month or two after joining MakLab, life and work took over, and I began to print using online services such as 'Shapeways'. By the time I came to print my first full set of pipes early this year, I'd found a more affordable print service nearer at hand in London - 3DprintUK, and was able to produce a full set of Parlour pipes. The common stock of Smallpipes is quite a costly item to produce through these kinds of services, which charge by the volume of material used. The drones of this set are a prototype for a set of Smallpipes I intend to print for myself at some point, they've got quite large tops, and other internal dimensions scaled down from a set of Highland drones plans given to me by a friend of my fathers, with reference to the sizes used in the Smallpipe drones I like, and have quite a rich sound. Like all the drones I've printed so far, the changes in diameter in the drone are curved, to try to reduce turbulence - 'Kiddized', after the work of the late John Kidd on Highland Pipes. I believe it has a good effect, and can't hurt at any rate - 3D printing does mean it doesn't take any more or less trouble to try things like this!

The printing of the 'extended range' chanter has become a process of refinement, and to help with this I've purchased an 'Orion', which is a Delta style printer with a tall build volume, tall enough to print most pipe parts. The ‘A’ chanter still has to be printed in two sections, but at the moment this is fine as it means I can re-print the barrel section above high ‘a’, which is important in reaching the second register. Refinements in this section of the chanter are helping me to 'loosen up' high ‘b’, to begin to tune up the notes above that, and to eliminate some new problems including a kind of choking that is affected by the placement and angle of the special 'register hole' I'm using. (Anyone who was at the competition will have heard this, unfortunately).
I've found pipe makers to be generally dismissive of theory when it comes to making pipes, and have come to understand why. As I've said, I use a spreadsheet system to estimate 'first placement' of tone holes on a chanter, but expect to have to do a lot of work after that point. Reeds really can be an unknown quantity, particularly for me as I don't make them myself. The spreadsheet has to be fed with values for each type of reed (should really be re-done for every single reed), that I have to find crudely by cutting lengths of plastic tubing, so it's necessarily very approximate. I've begun to make the first print piece by piece, in a modular form, which I then trim into tune as far as is possible, noting the adjustments made and then putting these back into the model for the next print. This is 'trial and error', which is the method by which all musical instruments have surely been refined.
3D printing by its very nature, tends to tempt out wild and surreal ideas. Currently in AutoCAD I have a file for an organic-looking fat-bellied Bass Smallpipes chanter, which I intend to print out soon, probably in hot pink plastic. Some of the drawings I have for stands of drones, more versatile than on a standard set, are mind boggling to behold, circles within circles, loops within loops, and strange intricate pagan-looking geometric symbols on which the various components have to be built and 'revolved' into 'solid' 3D objects. At some point I'll post some pictures of these drawing sets on my website, just as art in their own right!

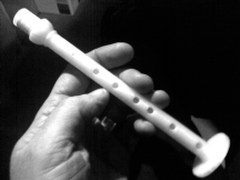
A 3D-printed copy of the ‘Montgomery’ smallpipes
I'm including here a diagram of the 'extended range' chanter as it currently stands. Hopefully this is informative for pipers, and of interest to pipe makers. I'm not sure how this design might be produced in wood, but hopefully it can be done, and I've so far been approached by one pipe maker, Nate Banton of New York, who has expressed an interest in trying. Anyone else, piper or maker, who'd like to talk to me about the chanter, please feel free to get in touch at ; This email address is being protected from spambots. You need JavaScript enabled to view it.
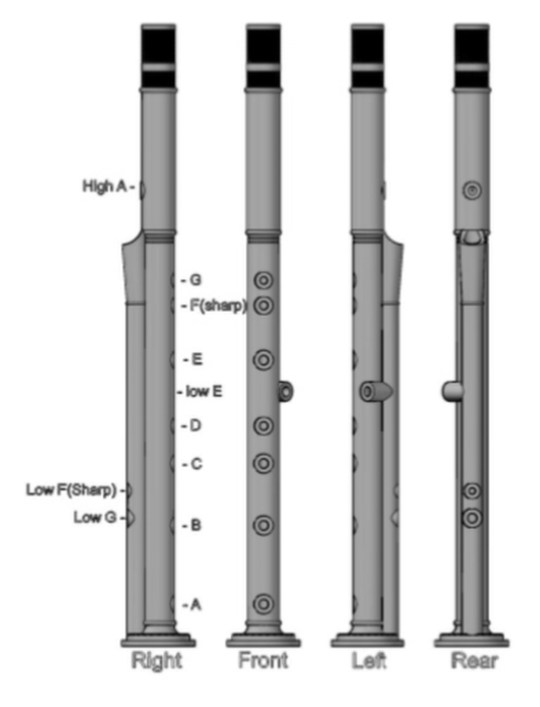
Lindsay Extended Range Smallpipes Chanter v1.0
[This work is licensed under the Creative Commons Attribution-ShareAlike 4.0 International License.]
